Step 4: Patching
This step is happening in tandem with Step 3 (slice annotation)
Aim: To determine whether a fixed patch size can be used effectively for patching. We propose running a patching algorithm on one stain and analysing the distribution of patches it generates. If a large majority of the patches are a specific size, that size can be considered the optimal. Since the distribution of patches will be the same across stains, the optimal patch size found can be used across all three stains.
Summary
This step runs alongside slice annotation to determine whether a fixed patch size can be effectively used. Three different patching algorithms are compared:
- Dynamic Epithelial Pixel Width Algorithm (Alyssa): Adjusts patch size incrementally based on tissue characteristics, ensuring adaptability but requiring fine-tuning.
- Edge Following Algorithm (Aryaman): Uses a skeletonized epithelium mask to align patches along the tissue structure, maintaining consistency but being computationally expensive.
- Static Epithelium Pixel Width Algorithm (Eli): Uses predefined patch sizes based on epithelium width, making it efficient but less adaptable to irregular shapes.
Research also explores tilting patches to optimize orientation, patch size selection, and the impact of adaptive pooling on machine learning performance. The goal is to establish a standardized patching method that balances efficiency, accuracy, and model interpretability.
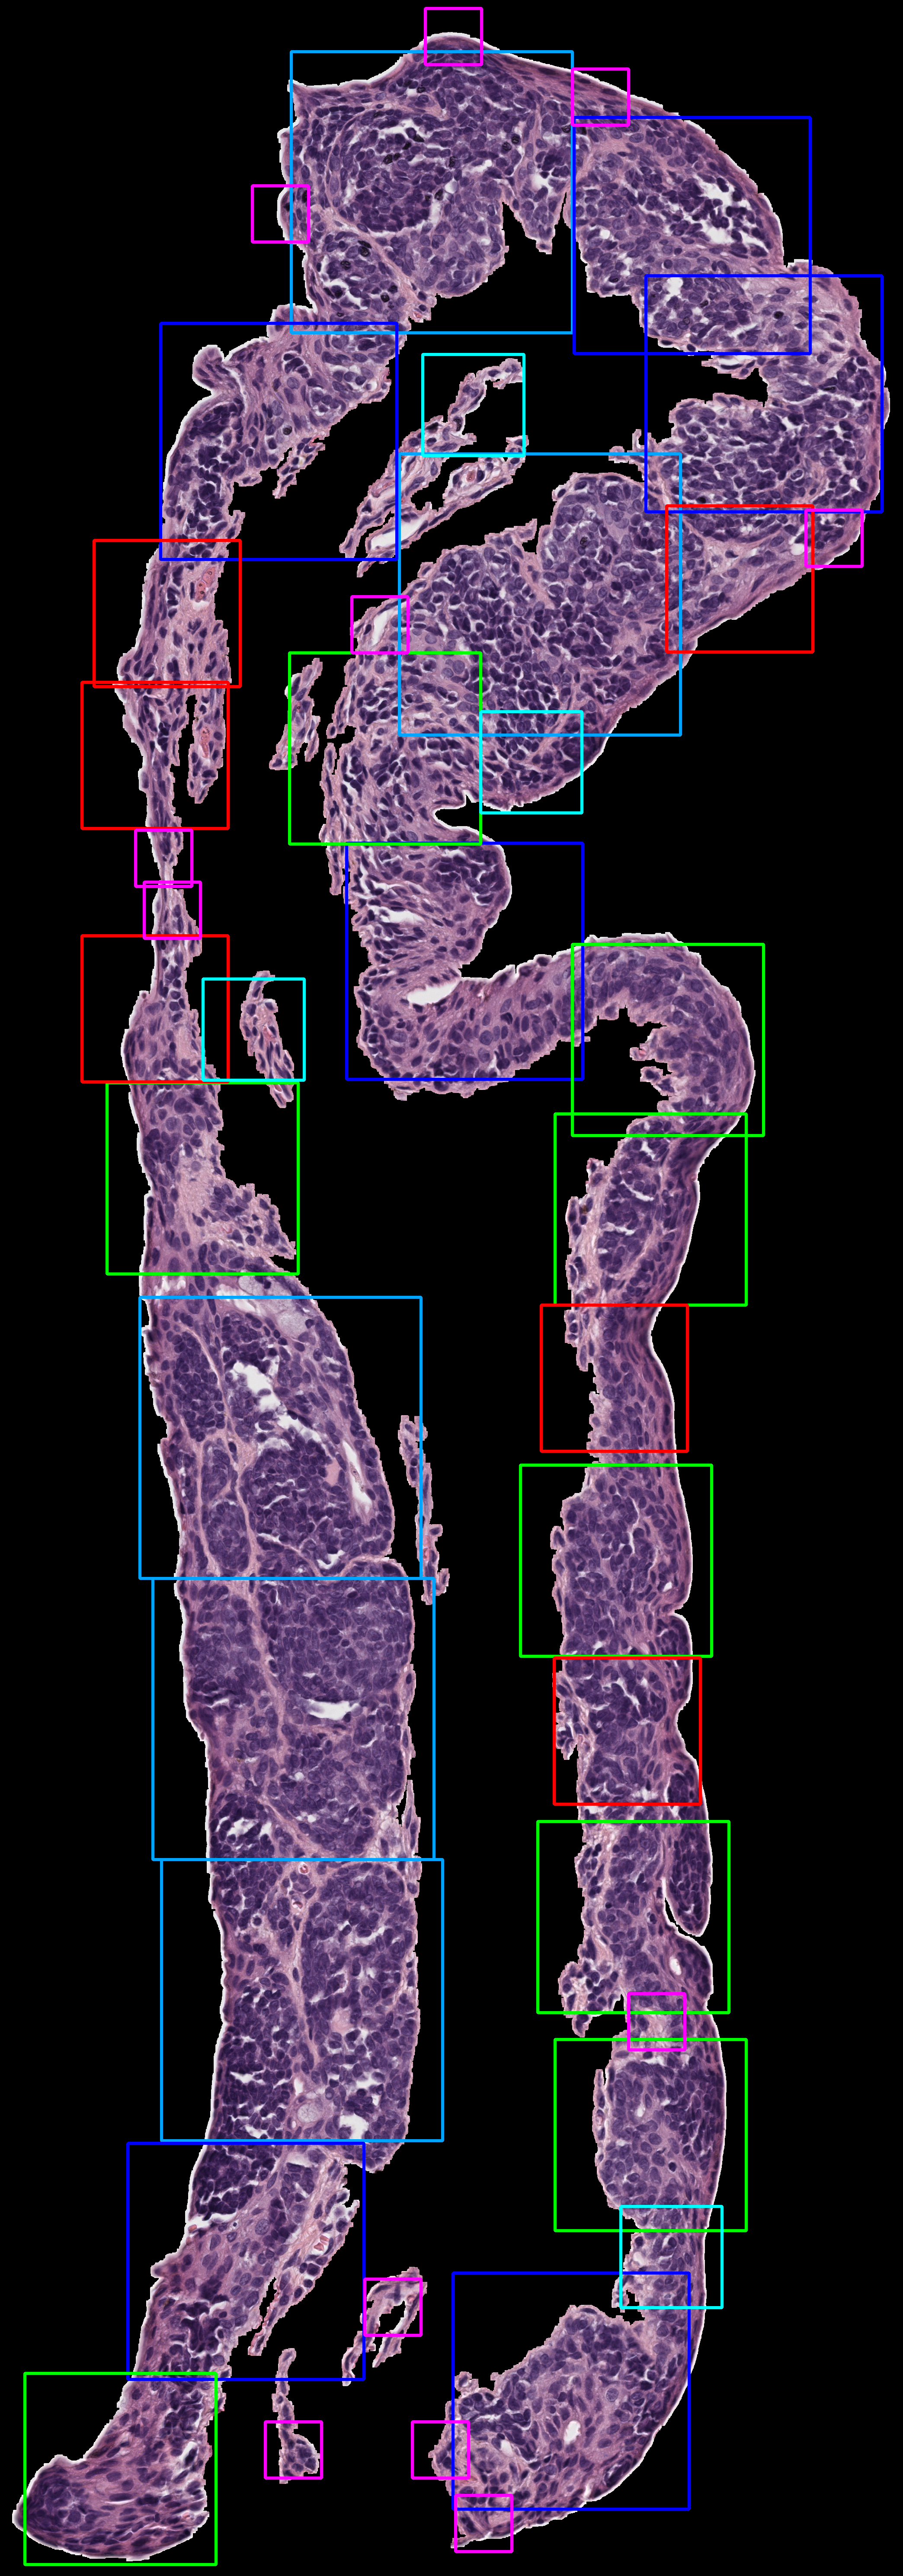
Two Different Approaches
Below are images comparing the outcome of our two approaches to the patching problem. Find more details on each algorithm below the comparison.
Comparing Approaches
| Feature | Dynamic Epithelial Pixel Width Algorithm | Edge Following Algorithm |
|---|---|---|
| Computationally Inexpensive | ||
| Incorporates Tilting | X | |
| Discards data if patches overlap too much | X | X |
| Incrementally Changes patch size | X | |
| Changes patch size based on epithelium width | X | |
| Uses Pre-determined patch sizes | X | |
| Sensitive to Image Quality | X | X |
| Can Handle Irregular Tissue Shapes | X | X |
Dynamic Epithelial Pixel Width Algorithm
By Alyssa
- Incrementally generates patches over tissue images to segment and identify key regions such as the epithelium, stroma, and background using color thresholds.
- Isolates the epithelium using a black-and-white mask to target only relevant tissue areas.
- Excludes non-tissue regions, enhancing focus on areas of interest.
- Adds patches using a fixed size, iteratively stepping through the tissue with small increments.
- Provides fine-grained coverage with some overlap between patches to maintain continuity and adaptability to different tissue widths.
- Discards patches with excessive overlap (greater than 10%) to avoid redundancy.
| Pros | Cons |
|---|---|
| Patches grow until they cover a sufficient region of the epithelium, which allows for better adaptability across different epithelium widths. Threshold allows for some overlap between patches, which helps create a balance for ensuring coverage and not missing any key spots without too much duplication. Provides thorough coverage on narrow and irregular tissues and performs well in capturing detailed tissue information when applied to smaller, more uniform samples. |
This method incrementally increases patches using very small step sizes, making code time consuming (likely why this algorithm does not work as effectively with larger, thicker tissues (e.g. the large Copenhagen slices)). The algorithm depends on color thresholds to identify tissue regions, which may lead to inconsistencies or require frequent adjustments due to variations. Differences in color characteristics, staining protocols, lighting, or image quality could create challenges for reliable application. Depends on specific parameter values that were likely chosen by testing on a specific tissue slice. These parameters limit the code’s generalizability to other tissue slices, requiring manual adjustments through trial and error. |
Results
Edge Following Algorithm
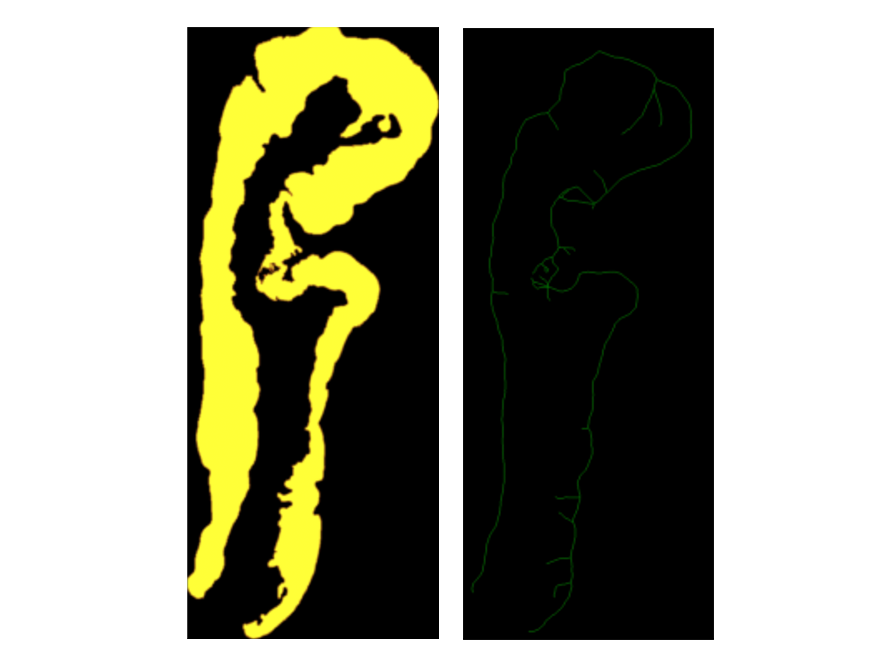
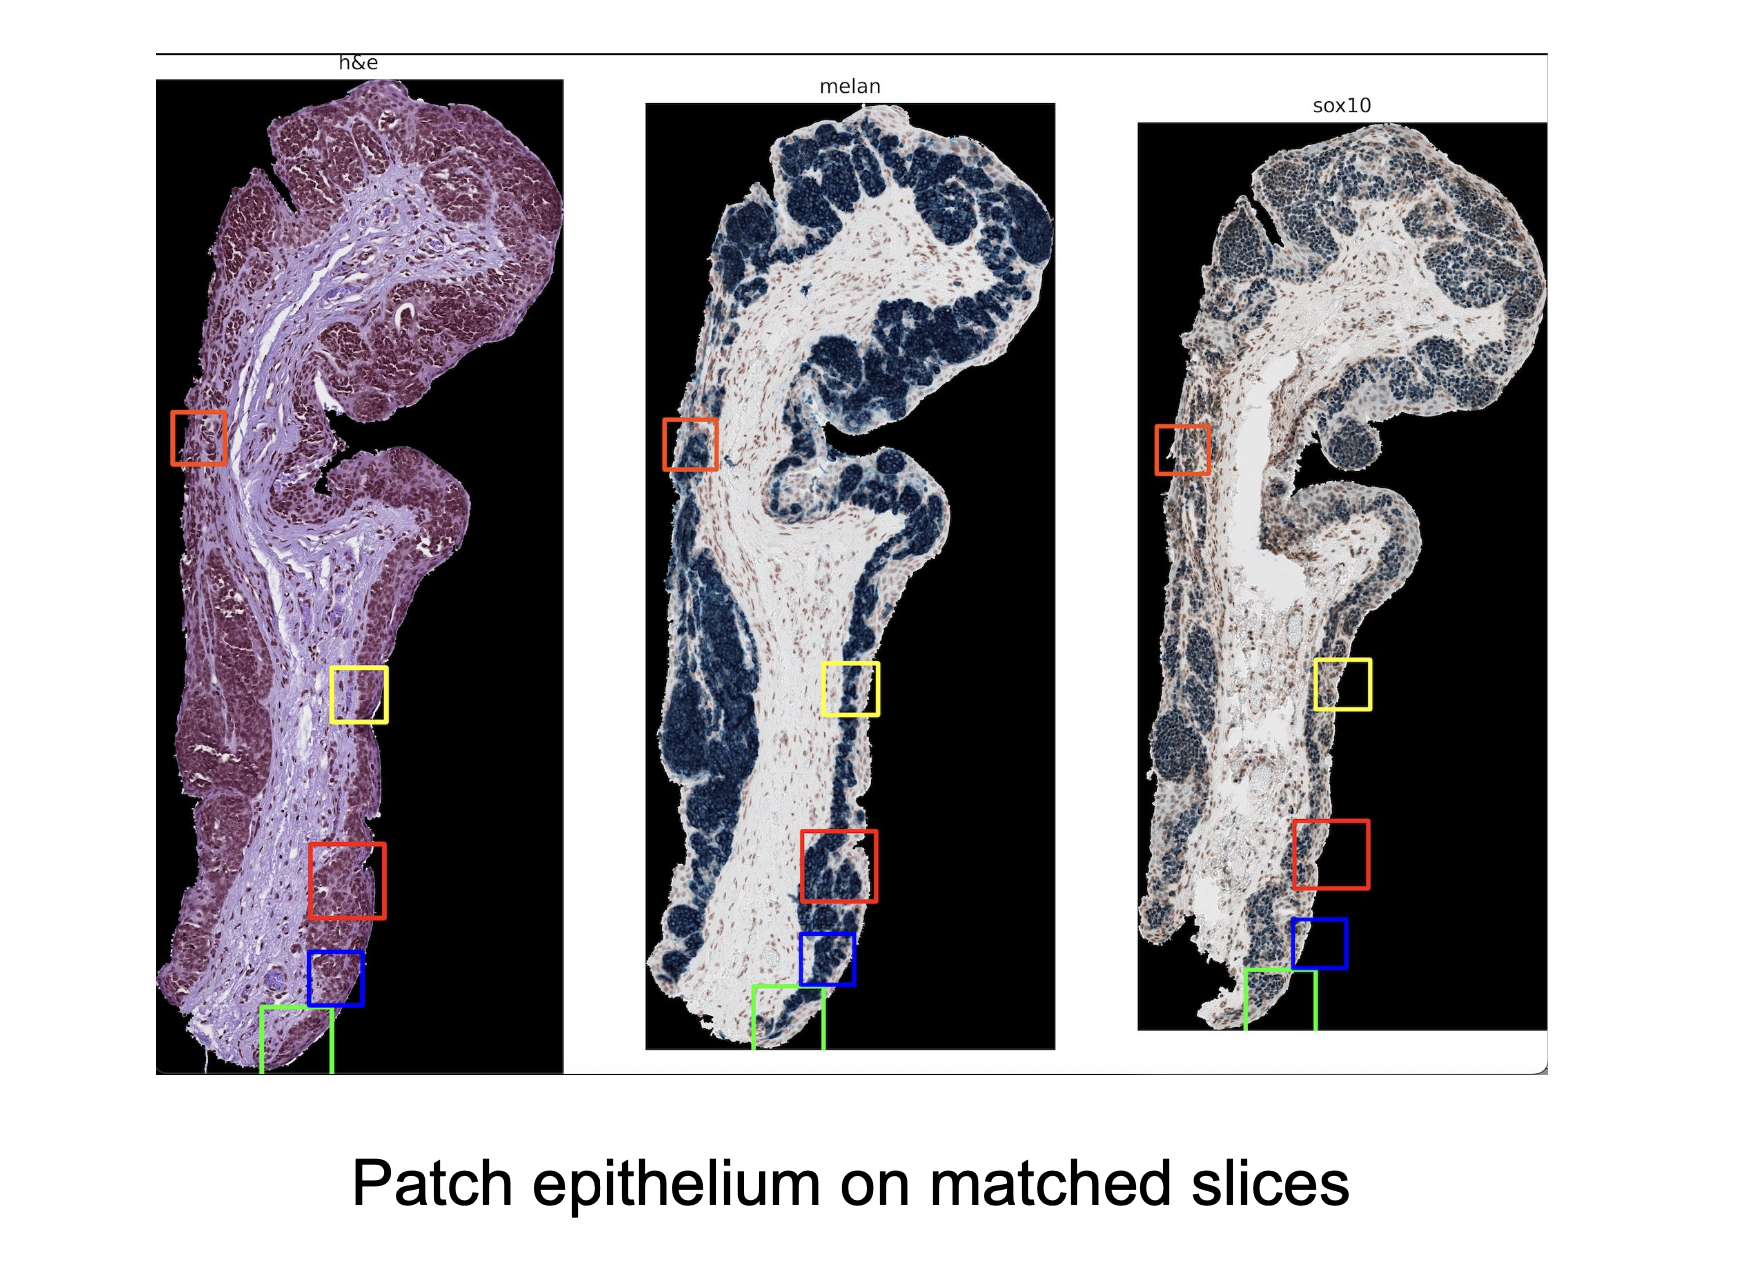
By Aryaman
- Aligns staines tissues and extracts patches for comparative analysis across stains (H&E, Melan-A, and Sox-10).
- Creates an epithelium mask, converts it into a binary and creates a skeleton i.e. the central line through the epithelium.
- Uses the skeleton as a guide to place patches.
- Chooses a point on the skeleton and calculates the slope between neighboring points to define the orientation of the patch.
- Forms a quare patch that aligns with the boundary.
- A patch is kept only if it includes regions from the stroma, epithelium, and background; ensuring the full width of the epithelium is captured.
- Overlapping patches are discarded.
Follow this step-by-step manual to patch the epithelia.
Code required:
- rotate_extract_patch (1).py
Run rotate_extract_patch (1).py.
Results
| Pros | Cons |
|---|---|
| The patch will be generated from the points along the centerline, ensuring that the epithelium is well-positioned within the square patch. Patches are aligned perpendicular to the skeleton, capturing the structural direction of the epithelium. Consistency across patches since the points are always centralized within the epithelial region. Patch dimensions can be customized to increase the chances of covering the entire epithelium in a single patch. |
Calculating skeletons, determining gradients, and filtering patches for overlap can be computationally intensive, especially for large images. Code checking if the patch contains both stroma and epithelium is also time consuming. The patch size is fixed, and the algorithm samples along the skeleton at intervals, potentially missing parts of the epithelium in patches. The fixed patch size may not be optimal for varying epithelial dimensions. If a specific epithelial region is wider than the patch width, the algorithm may fail to capture it entirely in a single patch. Since the algorithm discards patches that do not include stroma, epithelium, and background, there is a risk that such regions might be missed entirely. Skeletonization errors (e.g., gaps or noisy lines) could result in incomplete or misaligned patches. |
Tilting the patches
Tilting of patches could lead to smaller, more efficient patches. Smaller patches are advantageous because we will get more data to work with. Each patch will also have less data in it, and our model may have an easier time picking up on patterns. Also, tilting the patches, means that the epithelium is always in the same orientation in each patch. Our model will not have to determine the orientation of a sample. Perhaps, this will lead to a simpler, more efficient model.
Edge Tilting Algorithm
We use edge detection and find the slope between two points on the edge. Using that slope, we create one edge of the square. This way, the square is tilted to match up with the angle of the sample.
Upsides: There is already code for that edge detection and finding the edge of the square.
Downsides: The samples are very irregular, so, when the edge is extended, a patch could cut off a lot of epithelium. That cut off epithelium could then be picked up by other patches, but there might be inefficiency in the patching this way. Also, see downsides of the Edge Following Algorithm.
Regression Tilting Algorithm:
We pick a random patch. Next, we identify the stroma and the outside of the sample. We treat the pixels of the stroma and the outside of the sample as points. Using these points, we run a regression model to draw the line that most efficiently crosses the epithelium. Now, we will tilt the patch so that two edges are perpendicular and two edges are parallel to that regression line. This will create a patch that follows the contour of the epithelium. Below is a visual representation of this process.
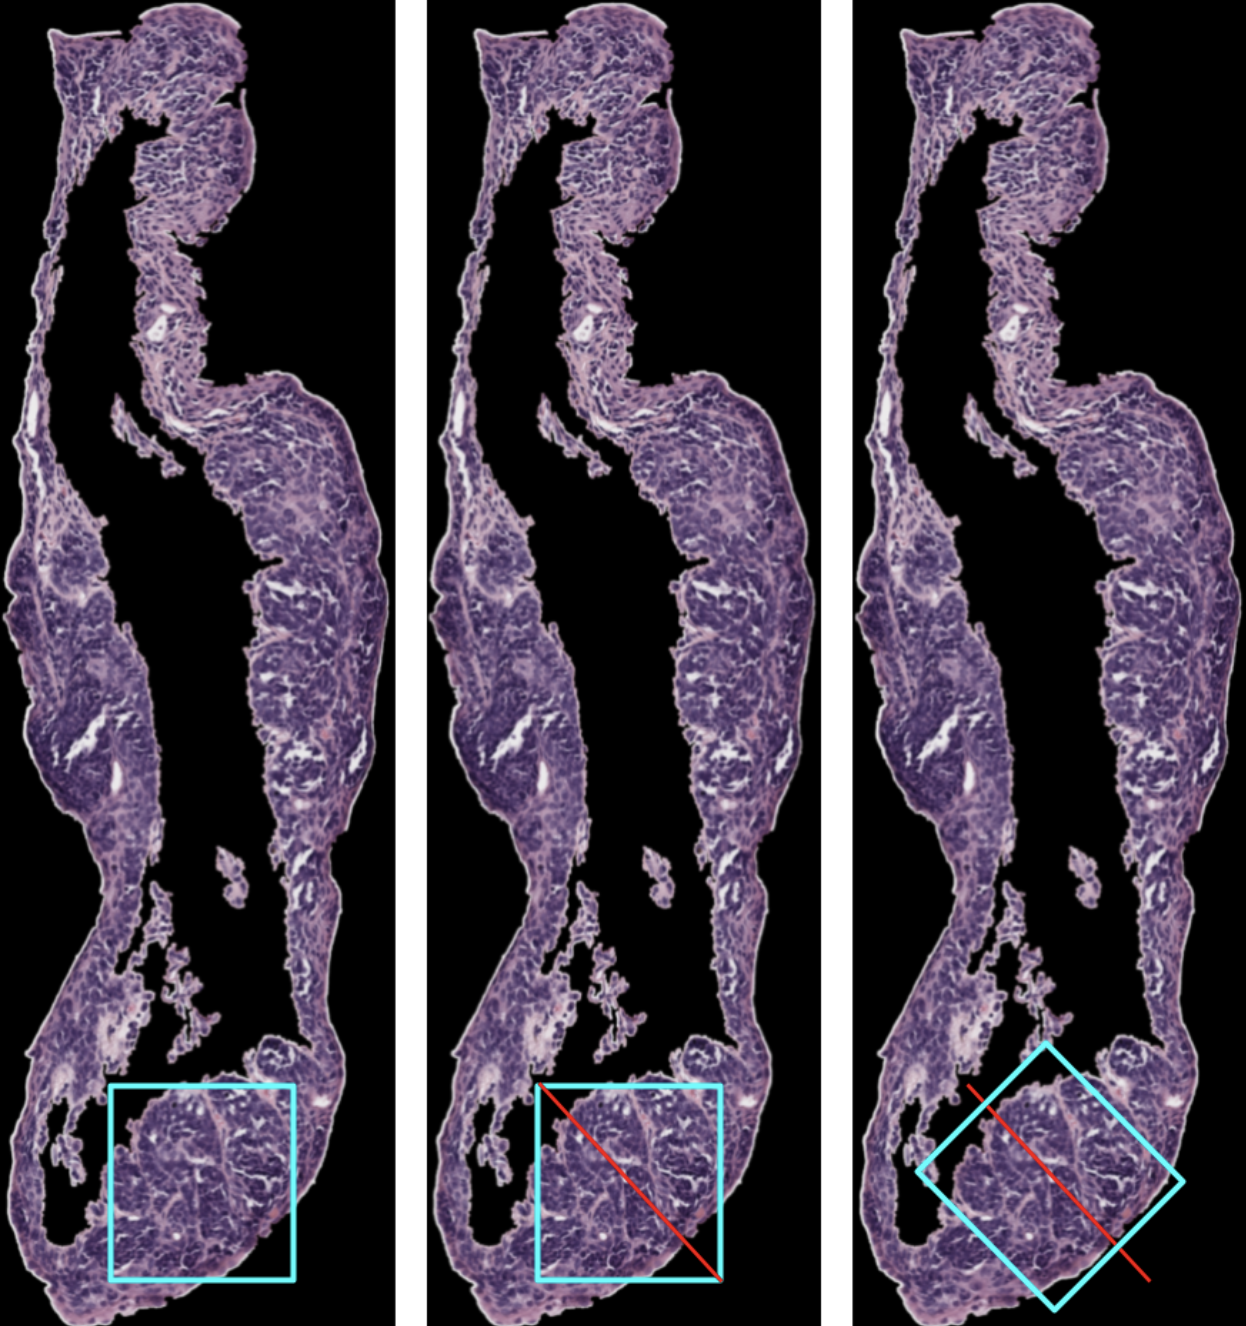
Upsides: this method is not very computationally expensive, especially with the epithelium mask that we already have for many samples.
Downsides: When tilting an existing patch, we cannot ensure that the patch still includes the entire epithelium unless we also resize the patch.
Note: This separates the tilting from the patching process. While this is not necessarily a negative, we don’t know which patching algorithm works best with this method yet. It adds another step to the process.
Patch Design and Optimization QnA
Question 1: Why are square patches used in tissue analysis?
Square images are commonly used in tissue image analysis as they naturally fit into the grid-like structure of digital images, making it easier for algorithms to scan and analyze oatterbs, They streamline calculations for convolutional neural networks (CNNs), which process grids of data efficiently. This uniformity ensures all parts of an image are treated equally, avoiding distortions or biases that could arise from irregular shapes, i.e. rectangular patches. Additionally, square patches align with pre-trained models, saving time and effort by leveraging existing resources. They also simplify techniques like pooling, which reduces data size while preserving important features, focusing on key details without unnecessary complexity. Overall, they offer a balance of computational efficiency and accuracy.
Additional Sources: - “Tissue classification for laparoscopic image understanding based on multispectral texture analysis” - “Machine learning algorithm for retinal image analysis” - “patchIT: A Multipurpose Patch Creation Tool for Image Processing Applications”
Question 2: Why is patch size in powers of 2? (e.g. 32 x 32, 256 x 256, 512 x 512, etc.) Are there alternatives?
CNN layers benefit from power-of -2 to maintain spatial coherence and compatibility with pooling and downsampling operations. Non-standard dimensions risk spatial distortion or mismatched sizes. GPU’s are optimized for power-of-2 memory alignment, with non-standard dimensions causing potential performance drops, though modern GPUs handle them better. Internal resizing of images wastes memory, processing time, and could introduce rounding errors. Non-standard sizes may also require extra padding to ensure compatibility with layer operations. The 224x224 image size standard introduced in AlexNet, set a precedent for future architectures. Nvidia Tensor Cores optimize hardware efficiency with batch sizes in multiples of 8, while unrelated, it shows how aligning dimensions with hardware multiples improves efficiency.
To supplement our analysis, we referenced the following study:
Effect of patch size and network architecture on a convolutional neural network approach for automatic segmentation of OCT retinal layers
Additional Sources:
- Keras: MaxPooling2D - ImageNet Classifcation - Deep Convolutional Networks - Nvidia Matrix Multiplication Guide - Pooling Layers in Neural Nets
Question 3: How do researchers determine the optimal number of patches?
The number of patches depends on the variety in the images and the difficulty of identifying differences in the classes. Too many patches can lead to over-segmentation and loss of context. Additionally, it increases the computational cost. Too few patches would make it hard for the model to generalize to unseen data. If we can determine the optimal patch size, that can determine the optimal number of patches by managing the overlap.
For this question, we conducted a literature review which included creating a post on the QuPath forum. It received one response as of January 27, 2025.
QuPath Forum: Optimal Number of Patches
Question 4: How many distinct patch sizes should we consider? Should we fit patches on every tissue slice to visualise the distribution?
We will develop a histogram of all patch sizes used for the 106 tissue slices to determine the modality and distribution of patch sizes we will ultimately use to train our CNN model.
Question 5: Does having more patches make the ML model more complex? Consequently, shold we try to minimize the number of distint patch sizes we use?
We will answer this question by reviewing existing research on patch-based machine-learning models and considering the implications of using multiple and minimal patch sizes.
Additional Sources: - “Effect of patch size and network architecture on a convolutional neural network approach for automatic segmentation of OCT retinal layers” - “Filter size in CNNs and how they relate to overfitting/underfitting”
Question 6: If adaptive pooling can be used effectively to handle images of different sizes (i.e. handle distinct patch sizes) can a ML model distinctly identify patterns in small patches or large patches?
We explored how adaptive pooling in CNNs maintains fixed output dimensions while handling varying input sizes. By examining how convolutional layers learn hierarchical patterns, we assessed whether adaptive pooling preserves distinct features in small and large patches, ensuring the model can still identify patterns at different scales.